Self-serve returns is the native setting of Shopify that allows manage returns directly from the platform, enabling you to save valuable time and ensure a better experience for your customers.
By implementing return rules, you can establish terms for item returns, including the allowed time period, return fees, and items that cannot be returned. During the self-serve return process, customers can view the estimated refund amount for eligible items, providing transparency and building trust with your customers.
Please note: This feature is only usable if the new customer account feature is switched on, which unlike classic customer accounts, allows users to log into the shop without needing a password. Therefore, users can log in using only the email address they use to place orders, receive a one-time code to enter in the login panel, and automatically access their entire order history, all saved addresses, shipping details, and everything related to purchasing on the shop.
In this article, we will delve into the functionalities of the self-serve return setting.
Self-Serve Return Setting Configuration
The first step to configuring return requests is to activate the "self-serve returns" option in the Shopify control panel. Here's how:
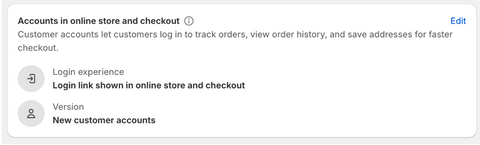
- From the Shopify control panel, go to Settings > Customer Accounts.
- In the Self-Serve Returns section, click Turn on.

After enabling the self-serve returns service, it's necessary to allow customers to access the online store and proceed to checkout using the new customer accounts. You can do this in one of two ways:
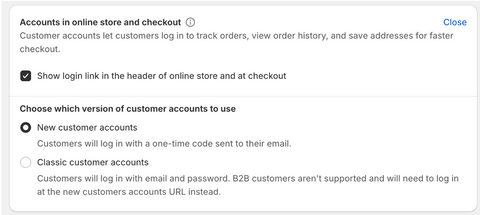
- Configuring the new account from Settings -> Customer Accounts-> Edit-> Modifica-> By checking the option:
1. Show login link in the header of online store and at checkout
2. New customer accounts
- Linking the URL of the new customer accounts into the online store, in the section most suitable for customer needs.
Adding new customer accounts URL to the store policy
- From the Shopify control panel, go to Settings > Policies.
- In the Return Policy section, select the text you wish to insert as a hyperlink, then paste the URL of the new customer accounts.
- Click Save.
You can also add the URL of the new customer accounts within a page, such as the returns and refunds page, or within the footer.
Adding return request instructions to the store in the refund policy
Provide additional details regarding the return process in the relevant section of your store's policies or on a page of your store.
You can use and customize the following instructional examples on how a customer can make a return request on your online store.
*Submit a return request*
Click the profile icon in the store's navigation, or go to the refund policy or a returns page, and then request a return.
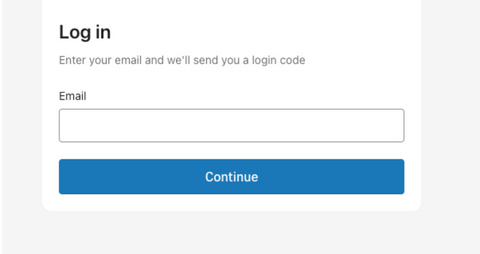
- Log in to your account:
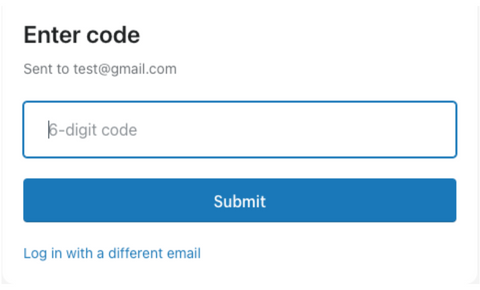
1.1 In the Email field, enter your email address, and then click Continue.
2.1 In your email account, open the email sent from our store and copy the six-digit verification code included in the email.
3.1 Go back to the online store, and then enter a six-digit verification code.
- Click the order that you want to submit the return for.
- If your order has more than one item, then select the items that you want to return.
- Select a return reason and add a note for the store.
- Click Request return.
If your return request is approved and requires shipping, then you receive an email with shipping instructions and a return shipping label. After the product is returned, you receive a refund.
Customer Self-Serve Return Process
To request a return, the customer must log into their customer account or through the navigation menu if you have activated the new customer accounts in the store, or through the URL of the new customer accounts if you have inserted it into your store.
The customer will need to enter the email address used to place the order and will receive a six-digit verification code in their inbox.
Upon receiving the code, He will enter it into the form field and will be granted access to his account.
Please Note: Return requests can only be sent by the customer for orders that have been fulfilled or partially fulfilled.
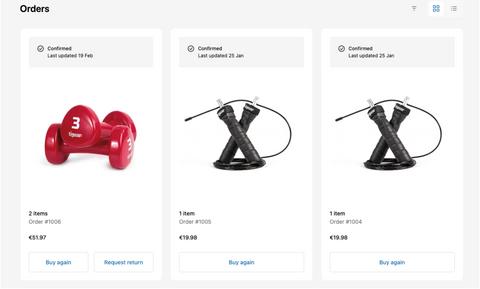
Now the customer will be able to view the details of all orders associated with the email address entered for login and can request the return of one or more items by clicking on the "Request Return" item where they can define the quantities to return in case of multiple purchases, select the reason from a dropdown menu, and add any optional notes.
Every time a return request is initiated, both you as a merchant and the customer, will receive a confirmation email.
Merchant Self-Serve Return Process
Once the customer has submitted a return request, in addition to receiving a notification email at the email address set in the store details section, you will be able to manage the operation through the Orders -> Return Request section.
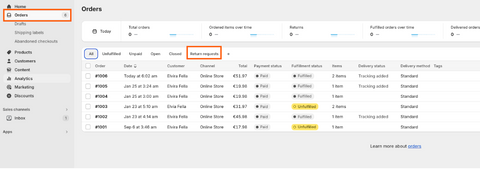
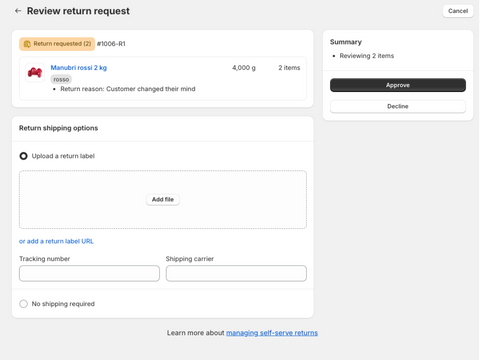
Upon entering the order with a return request to manage, you will need to click on "Review Request" to understand whether to accept or reject it based on your store's return policies.

Once the request is reviewed, you can decide to:
- Reject the return, selecting from a dropdown menu the reason for refusal (the customer will not be able to view the reason) and leaving a message to the customer in case the return does not comply with the return policies.
- Approve the return, where, if shipping is required, you will need to upload a return label and enter the courier's tracking number.